
The Golf Backswing, Checkpoint by Checkpoint
Quick answer: Focus on five key checkpoints: takeaway, wrist hinge, shoulder turn, weight shift, and top position. Practice one checkpoint per session to build a smooth, balanced backswing that sets up an easy downswing. Use specific drills for each step, keep your swing short, and maintain your balance throughout.
The golf backswing is the move from address to the top, and its job is to set up an easy, on-plane downswing.
12 Strike
What the backswing must do
The backswing does not hit the ball, but it decides how easy the downswing will be. A good backswing does three jobs: it turns the body so there is room to swing the club back down, it sets the club on a path that can return to the ball from inside the target line, and it keeps your balance so the low point of the swing stays in the right place. It is part of the full golf swing sequence, and it starts from a sound setup and grip. The diagrams below show a right-handed golfer from face-on.
Checkpoint 1: takeaway
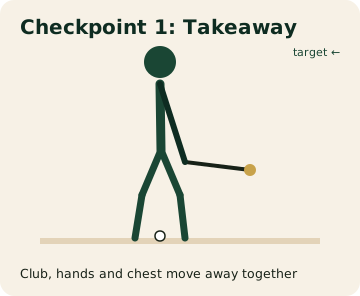
Move the club, hands, arms and chest away together, low and slow, for the first couple of feet. When the shaft is parallel to the ground, check two things: the clubhead is just outside your hands, and the toe of the club points roughly up at the sky. If the clubhead is behind your hands, you have whipped it inside with the hands; if the face points at the ground, it has closed.
Drill: put an alignment stick or a club on the ground along your toes. Swing back to parallel and stop: the shaft should be roughly parallel to the stick on the ground.
Checkpoint 2: wrist hinge
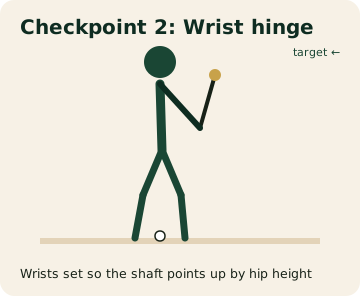
As the hands pass hip height, the wrists begin to hinge so the club points up. By the time the lead arm is parallel to the ground, the shaft and the lead arm make roughly an L shape. Hinging gives you speed later, for free. Hinging too early, by picking the club up with the hands, or not at all, by keeping the wrists stiff, both make good contact harder.
Drill: make half swings to the L position and hold it for two seconds. Check that the butt of the club points roughly at the ball-to-target line.
Checkpoint 3: shoulder and hip turn
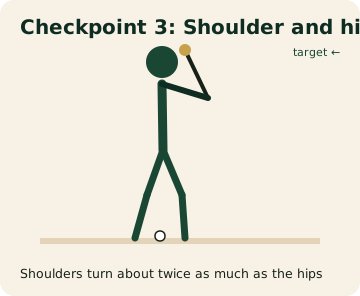
Keep turning your chest away from the target. The shoulders turn more than the hips, which gives you coil: tension between the upper and lower body that unwinds in the downswing. The lead shoulder moves under your chin. Keep the spine angle you set at address; the turn happens around it, not by standing up or bending more.
Drill: without a club, cross your arms on your chest and turn until your back faces the target, keeping your head roughly where it started. Then repeat it with a club.
Checkpoint 4: weight into the trail side
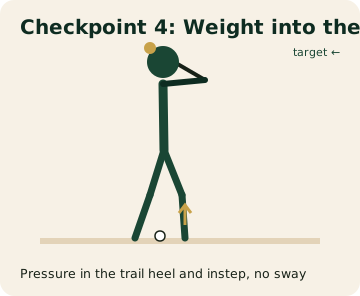
As you turn, pressure moves into the trail foot, mostly into the heel and the inside of the foot. That is a turn, not a slide. If your hips slide away from the target past your trail foot, that is a sway, and you will have to slide back to reach the ball. Keep the trail knee flexed; if it straightens fully, you lose the base you need to turn.
Drill: place a ball or a headcover just outside your trail foot. Make backswings without your trail knee or hip moving outside it.
Checkpoint 5: the top (how long is enough)
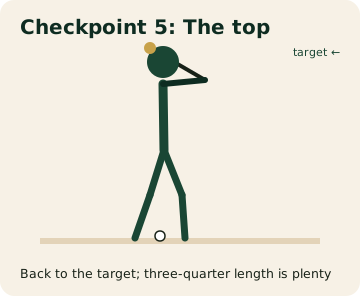
At the top, your back faces the target, most of your weight is on the trail side, and the club points roughly toward the target or a little short of it. For most beginners a three-quarter backswing, with the hands around shoulder height or a little above, is plenty. A longer swing often adds more mistakes than speed. Swing as far as you can turn while keeping your balance and your grip.
Drill: make swings to the top and hold for a count of two. If you cannot hold it without wobbling or loosening the grip, shorten it.
Common mistakes
- Sway: the hips slide away from the target instead of turning. Fix with the trail-foot drill above. It causes fat and thin shots.
- Over-swing: the club goes past parallel and the lead arm collapses. Make a three-quarter swing; it is usually straighter.
- Laid off at the top: the club points well left of the target (for a right-hander). It often leads to steep, over-the-top downswings and slices.
- Across the line: the club points well right of the target at the top. It often leads to pushes and hooks.
- Arms only: the arms swing up but the chest does not turn. Feel the back turn to the target.
- Rushing: a quick backswing leaves no time to set the club. Use the count on golf swing tempo.
Drills
- Mirror checkpoints: face a mirror and stop at each of the five checkpoints, comparing with the diagrams.
- Pause at the top: hold the top for a one-count before swinging through. It shows whether you are balanced.
- Feet together: hit short irons with your feet close together. You cannot sway without losing balance.
- Film it: one swing from face-on on your phone each week, compared with the checkpoints.
Once the backswing feels reliable, the next step is the golf downswing sequence.
Seniors and limited flexibility
If your back or hips are stiff, a smaller turn is fine. Let the lead heel lift slightly off the ground in the backswing to allow more turn, flare the trail foot out a little at address, and keep the swing shorter and smooth. A full shoulder turn is not required to hit good shots; good contact from a shorter swing beats poor contact from a long one. Warming up first helps, see golf warm up routine.
How the backswing changes with different clubs
The checkpoints are the same for every club, but the backswing looks a little different. With a wedge or short iron, you stand closer to the ball, so the swing is more upright and often a little shorter. With the driver, you stand farther from the ball with a wider stance, so the swing is flatter and the turn feels bigger. Do not try to make every backswing the same length; let the club and your setup decide. Ball position and stance width for each club are on golf ball position.
Practise one checkpoint per session
Trying to think about all five checkpoints on one swing is a recipe for a stiff, slow swing. Pick one checkpoint per range session, use its drill for your first 20 balls, then hit the rest of the bucket thinking only about your target. Over five sessions you will have covered all five.
Common questions
What is the purpose of the backswing?
The backswing sets up the downswing by turning the body, hinging the wrists, and shifting weight to the trail side. It does not hit the ball but prepares for the strike.
Why is the wrist hinge important?
The wrist hinge creates potential energy for speed and helps keep the club on the correct path. Hinging too early or not at all can lead to poor contact.
What happens if the backswing is too long?
A long backswing can cause loss of balance and make it harder to control the downswing. It often leads to inconsistent contact and slices or hooks.
How does the backswing differ with different clubs?
The backswing checkpoints are the same for all clubs, but the length and posture change. With wedges, the swing is more upright; with the driver, it is flatter and wider.
Related fixes
- - The golf backswing is part of the full golf swing sequence
- - For ball position and stance width for each club
- - See a warm-up routine to prepare for the backswing
- - Learn about the golf downswing sequence
Last updated: 2026-10-21
Free tip sheet: First Round Checklist, 10 checks
A one-page printable PDF with the 10 checks for common first-round trouble. Free by email.
Part of Swing. See every page in this hub.